STEP 1 : Juzt-Reboot Suse Linux Backup Installation
- Install Juzt-Reboot using "Advanced Install"
- Partition your hard drive from the Juzt-Reboot FDISK menu.
[B] - Backup Restoration Boot Partition
[C] - No Restoration Boot Partition
[P] - Private Data Partition (Named the same as the boot partition)
Note: Partition sizes can be set to whatever required.
- When FDISK install operation is completed press [ESC Key] to save & exit.
- System will now reboot and the Juzt-Reboot multi boot menu will appear, place Linux disk in CDROM drive and select boot partition from menu by pressing [Enter Key] to begin install.
STEP 2: Begin Linux Suse Install > Press Enter to “boot”.


STEP 4: Start loading Linux Kernel.

STEP 5: Select Language > English is the default.


STEP 9: Select CD-ROM.


STEP 25: Setup Root password. Suggest 6 or more characters for password.

STEP 26: Network Configuration. Setup by users.


STEP 25: Setup Root password. Suggest 6 or more characters for password.

STEP 26: Network Configuration. Setup by users.


STEP 27: Add a new local User and press Next to start loading settings. Wait till the boot menu displays.


STEP 28: Booting SuSE Linux successfully. Done.

- Install Juzt-Reboot using "Advanced Install"
- Partition your hard drive from the Juzt-Reboot FDISK menu.
| Partition: | Attribute: | Name: | Size: | File System: | ||
| 1. | [B or C] | [SUSE] | [6000] | [Linux] | ||
| 2. | [P] | [SUSE] | [1000] | [Linux S/W] |
[B] - Backup Restoration Boot Partition
[C] - No Restoration Boot Partition
[P] - Private Data Partition (Named the same as the boot partition)
Note: Partition sizes can be set to whatever required.
- When FDISK install operation is completed press [ESC Key] to save & exit.
- System will now reboot and the Juzt-Reboot multi boot menu will appear, place Linux disk in CDROM drive and select boot partition from menu by pressing [Enter Key] to begin install.
STEP 2: Begin Linux Suse Install > Press Enter to “boot”.
STEP 3: Select “Manual Installation”.
STEP 4: Start loading Linux Kernel.
STEP 5: Select Language > English is the default.
STEP 6: Setup Keyboard > U.S. English is the default.
STEP 7: Install > Select Start installation.
STEP 8: Select > Start installation Update.
STEP 9: Select CD-ROM.
STEP 10: Select Language.
STEP 11: Finding Device > To load the driver [OK] or [Cancel] to continue.
STEP 12: Installation Settings. There are two settings that must be changed.
STEP 12: Installation Settings. There are two settings that must be changed.
STEP 13: Click “Change” and select “Partitioning”.
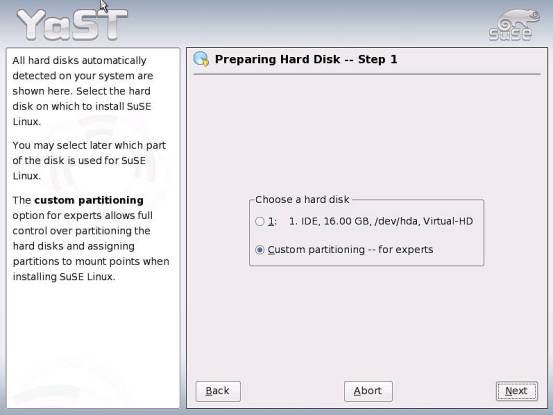
STEP 14: Choose the third option “Create custom partition setup”.
STEP 15: Choose Custom partitioning for experts.
STEP 16: Choose /dev/hda1 linux native and Click Edit
STEP 17: Partitioning screen displays. Setup /dev/hda1 File system to ext3” and Mount Point to “/” Setup /dev/hda2 File system to“swap” Click OK and Next to continue.
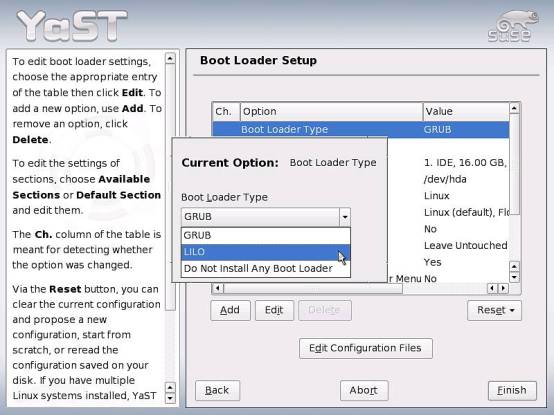
STEP 18: Back to Installation Settings and select Booting > Boot Loader Setup. Boot Loader Type: You can select either GRUB or LILO. Here we choose LILO.
STEP 19: Warning message appears after changing the settings. Choose “Propose New Configuration”.
STEP 20: Boot Loader Setup > Select Boot Loader Location and click Edit. Choose Boot Sector of Boot Partition /dev/hda1.
STEP 21: Click Finish after Setup.
STEP 22: Back to Installation Setup and select “Accept”. Warning message appears, Select “Yes, install”.
STEP 23: Start Installing. Wait for the installation.
STEP 24: First entry after installation will show some device finding screen, to install press Continue, or press Skip to exit.
STEP 26: Network Configuration. Setup by users.
STEP 27: Add a new local User and press Next to start loading settings. Wait till the boot menu displays.
STEP 25: Setup Root password. Suggest 6 or more characters for password.
STEP 26: Network Configuration. Setup by users.
STEP 27: Add a new local User and press Next to start loading settings. Wait till the boot menu displays.
STEP 28: Booting SuSE Linux successfully. Done.


0 comments:
Post a Comment