This exercise uses Director to animate changing images. We are going to use PhotoShop to create our animated content.
Select your favourite (or least favourite may be more appropriate) lecturer. Go to his/her staff page and save the image of that person by right clicking on the image and choosing Save Picture As... You can even select my pic if you find it.
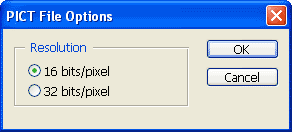 2. Open up the image in PhotoShop, choose File > Save as… and choose the PICT file format (*.PCT, *.PIC). Name the file face1.pct. After you click the Save button, the PICT File Options dialog appears (left). Choose 16 bits/pixel, then press OK.
The reason why we are using PICT format is because Director likes it the best when importing colour palettes, which is what we will be doing later.
3. Choose Select > All (Shortcut Control+A).
4. Choose Filter > Distort > Pinch and change the amount to 25.
5. Save this image as face2.pct.
6. Pinch the face again. This time you can go to Filter > Pinch (Control+F) as PhotoShop remembers the last filter you used with all its settings. Repeat this process a few times so you end up with 6 saved faces.
7. Open up all the faces in PhotoShop and choose Window > Arrange > Tile.
This option is available on Windows only computers and allows you to organise all the images in a tiled format across the screen.
We are now going to change the colour depth of the images. When we saved the image initially, we chose 16 bit colour. That equals thousands of colours that the image can use. Often an image does not need to be that high in colour depth. We are going to change the colour depth to 8 bit = 256 colours. This will result in a smaller image in file size, equaling half the size of the 16 bit version.
We are also going to use another tool in PhotoShop called Actions. Actions allow us to record a number of PhotoShop steps into a single object, which then can be applied to other images. Actions are useful when you have repetitive changes to make to a number of images. Instead of having to go through all the changes for every image, you record the process once and then run the action on other images.
8. Open up the Actions Window - Window > Show Actions.
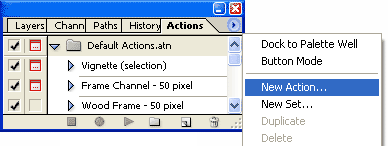
9. Choose New Action after clicking on the top right arrow (shown below). In the window that appears, give the action name colour depth change and then click the Record button.
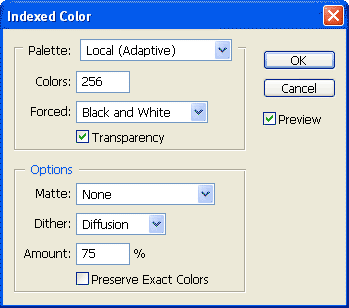
10. Choose Image > Mode > Indexed Colour and change the settings to those shown in the image below.
11 . Choose Layer > Flatten Image.
12. Choose File > Save (Control+S). You will notice that while we were choosing various options, these were recorded in the Actions window.
13. Click the Stop button in the Actions window. Click on one of your other faces and click the Play button.
Repeat the above step on all the face images so they all become 8-bit.
1. Choose File > Import, select all the face images you just made and click theImport button. The window below will appear. Next to Colour Depth, chooseImage (8 bits) and next to Palette, choose Import. Click the OK button.
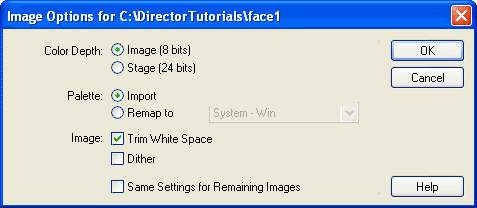
2. The same window will pop up for the next image. This time, next to Colour Depth, choose Image (8 bits) and next to Palette, choose Remap to and find the palette that was just imported with the last image (it should be called face1 Palette Internal). Click the Same Settings for Remaining Images checkbox. Click OK.
3. Open the cast window. You will notice you have 7 cast members, 6 images and one palette. Double click the palette cast member. A colour table opens. These are the colours used in the images you imported.
4. In the cast window, select all the images by clicking on the first, then pressingShift and clicking on the last image. Click on frame 1 in channel 1 and chooseModify > Cast to Time. You will notice that a single sprite is paced in the Score. This sprite contains the 6 images.
Rewind and play the movie. If you have the Loop Playback option on in the Control Panel or Control Toolbar (below the Stage), you will notice that as soon the animation ends, it restarts. As the animation begins again, there is a jerk in the animation because there is a significant difference between the first and last image. Let's see what we can do about that.
5. Select the sprite in the Score and press Control+C (Copy), then click on the frame just after the sprite and press Control+V (Paste).
6. Click on this second sprite and choose Modify > Reverse Sequence.
7. Select the 2 sprites by pressing Shift and clicking on both. Choose Modify > Join Sprites. This joins the 2 sprites into 1. This is not vital for our movie, but just something worth learning about.
Rewind and play the movie.
We are now going to create a film loop, which is a single cast member that can refer to a number of cast members or even a number of sprites.
8. Click on frame 12 (the end frame) of the sprite and drag it to frame 40. Play the movie. Instead of getting a longer animation, we now have a slower one. Drag the sprite segment back to its original length of 12 frames.
9. Select the entire sprite, and while holding down the mouse button, drag it to a vacant slot in the cast window. A dialog box will appear prompting you to name the film loop. Give your film loop a name and click OK. You just created a single cast member that refers to the 6 images that make up the animation.
NOTE - The film loop refers to the other cast members so you still need the original images to remain in the cast. A film loop also remembers all the properties of the sprites from which it was made. It is therefore important to set such properties (like ink effect) appropriately before making the film loop.
10. Delete the sprite from the Score. Drag the film loop into the Score and extend it to frame 40.
Rewind and play the movie. Notice the difference to the animation we saw in step 7.
Now would be a great time to save the movie too as we complete yet another tutorial. The completed tut can be seen here - tut4.dir. This will also allow you to see my face implode.
If you feel confident with this tut go on to the next, otherwise try repeating it using a different PhotoShop filter.
PhotoShop Section
1. Go to the staff web page - www.fbe.unsw.edu.au/staff/staff/Select your favourite (or least favourite may be more appropriate) lecturer. Go to his/her staff page and save the image of that person by right clicking on the image and choosing Save Picture As... You can even select my pic if you find it.
 2. Open up the image in PhotoShop, choose File > Save as… and choose the PICT file format (*.PCT, *.PIC). Name the file face1.pct. After you click the Save button, the PICT File Options dialog appears (left). Choose 16 bits/pixel, then press OK.
3. Choose Select > All (Shortcut Control+A).
4. Choose Filter > Distort > Pinch and change the amount to 25.
5. Save this image as face2.pct.
6. Pinch the face again. This time you can go to Filter > Pinch (Control+F) as PhotoShop remembers the last filter you used with all its settings. Repeat this process a few times so you end up with 6 saved faces.
7. Open up all the faces in PhotoShop and choose Window > Arrange > Tile.
This option is available on Windows only computers and allows you to organise all the images in a tiled format across the screen.
We are now going to change the colour depth of the images. When we saved the image initially, we chose 16 bit colour. That equals thousands of colours that the image can use. Often an image does not need to be that high in colour depth. We are going to change the colour depth to 8 bit = 256 colours. This will result in a smaller image in file size, equaling half the size of the 16 bit version.
We are also going to use another tool in PhotoShop called Actions. Actions allow us to record a number of PhotoShop steps into a single object, which then can be applied to other images. Actions are useful when you have repetitive changes to make to a number of images. Instead of having to go through all the changes for every image, you record the process once and then run the action on other images.
8. Open up the Actions Window - Window > Show Actions.
9. Choose New Action after clicking on the top right arrow (shown below). In the window that appears, give the action name colour depth change and then click the Record button.

10. Choose Image > Mode > Indexed Colour and change the settings to those shown in the image below.

11 . Choose Layer > Flatten Image.
12. Choose File > Save (Control+S). You will notice that while we were choosing various options, these were recorded in the Actions window.
13. Click the Stop button in the Actions window. Click on one of your other faces and click the Play button.
Repeat the above step on all the face images so they all become 8-bit.
Director Section
We are now ready to bring our content into Director, so start her up.1. Choose File > Import, select all the face images you just made and click theImport button. The window below will appear. Next to Colour Depth, chooseImage (8 bits) and next to Palette, choose Import. Click the OK button.

2. The same window will pop up for the next image. This time, next to Colour Depth, choose Image (8 bits) and next to Palette, choose Remap to and find the palette that was just imported with the last image (it should be called face1 Palette Internal). Click the Same Settings for Remaining Images checkbox. Click OK.
3. Open the cast window. You will notice you have 7 cast members, 6 images and one palette. Double click the palette cast member. A colour table opens. These are the colours used in the images you imported.
4. In the cast window, select all the images by clicking on the first, then pressingShift and clicking on the last image. Click on frame 1 in channel 1 and chooseModify > Cast to Time. You will notice that a single sprite is paced in the Score. This sprite contains the 6 images.
Rewind and play the movie. If you have the Loop Playback
5. Select the sprite in the Score and press Control+C (Copy), then click on the frame just after the sprite and press Control+V (Paste).
6. Click on this second sprite and choose Modify > Reverse Sequence.
7. Select the 2 sprites by pressing Shift and clicking on both. Choose Modify > Join Sprites. This joins the 2 sprites into 1. This is not vital for our movie, but just something worth learning about.
Rewind and play the movie.
We are now going to create a film loop, which is a single cast member that can refer to a number of cast members or even a number of sprites.
8. Click on frame 12 (the end frame) of the sprite and drag it to frame 40. Play the movie. Instead of getting a longer animation, we now have a slower one. Drag the sprite segment back to its original length of 12 frames.
9. Select the entire sprite, and while holding down the mouse button, drag it to a vacant slot in the cast window. A dialog box will appear prompting you to name the film loop. Give your film loop a name and click OK. You just created a single cast member that refers to the 6 images that make up the animation.
NOTE - The film loop refers to the other cast members so you still need the original images to remain in the cast. A film loop also remembers all the properties of the sprites from which it was made. It is therefore important to set such properties (like ink effect) appropriately before making the film loop.
10. Delete the sprite from the Score. Drag the film loop into the Score and extend it to frame 40.
Rewind and play the movie. Notice the difference to the animation we saw in step 7.
Now would be a great time to save the movie too as we complete yet another tutorial. The completed tut can be seen here - tut4.dir. This will also allow you to see my face implode.
If you feel confident with this tut go on to the next, otherwise try repeating it using a different PhotoShop filter.


0 comments:
Post a Comment